 Port Credit Marine Surveys & Yacht Delivery Society of Accredite Marine Surveyors There is something wrong in every photo below ! 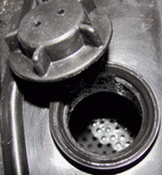  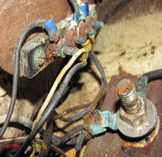 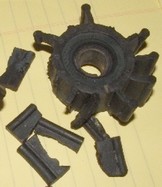  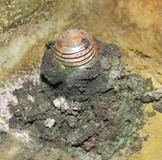 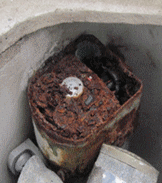    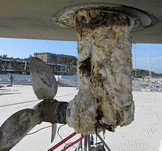  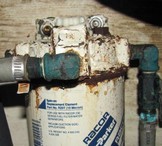   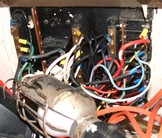 |
Boat Maintenance For (non) Idiots
My Dad (Bill) was an engineer who designed ships screws and later turbine blades for Pratt & Whitney. He was a meticulous craftsman at anything he turned his hand to. He could paint the entire house inside and out and only get paint on 1" of the brush and never a single speck on his fingers. |
||
| Bill's Rule #1 : The first step he took on any job was to take a few minutes to lay out his tools in the order they were needed. This not only kept them at the ready but also helped to think through the job before that first metaphorical cut. If it was a particularly messy job that created a lot of saw dust, resin dust or lots of small cut-offs, he would stop every hour or so, clean up, reorganize his tools and start again . Bill's Rule #2 : The second of Dad's lessons was " Always do the hard part first". If you get the dirty, rotten, stinking, miserable, toxic, knuckle splitting, back breaking, dirty work done first ..... everything else comes easy. |
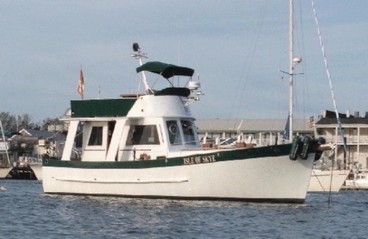 A shot of our previous boat is just here to keep your interest |
||
| While I do make an effort to adhere to Rule #1 I am not tempermentally suited to that kind
of fussiness however, every time I have forced
myself to work that way I have clearly seen
the value. Rule #2 seems to come naturally to me and Dad didn't
have to push me too hard in this direction.
Try it and you will see that this rule too
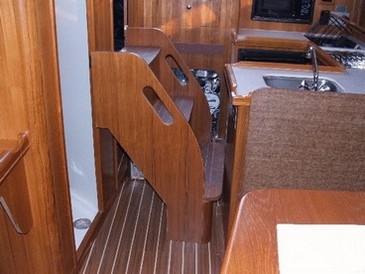
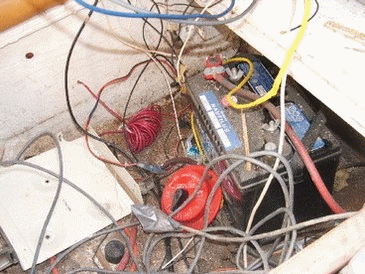
makes sense. Bill's Job #1: With rule #2 in mind, the first thing to do is make the basement accessible. The heart of any boat can be found in the "basement" but most boat builders make it too damn hard to get there. I recently surveyed a brand new 44' sailboat and it took me 10 minutes to get the engine uncovered and then I could see the oil filter but could not figure out how to reach it. Struggling with the five huge and heavy deck hatches of a Sea Ray 340EC does not encourage you to spend much time in the basement and when you get those 80lb. hatches up, where the heck do you put them ? The photos below are of the engine compartment of my 38 year old trawler. When we bought her in 1993 this compartment was a black hole and to get in there we struggled to lift very heavy hatches and then had to find a place to put them... Install hinges, a revolutionary concept ! |
|||
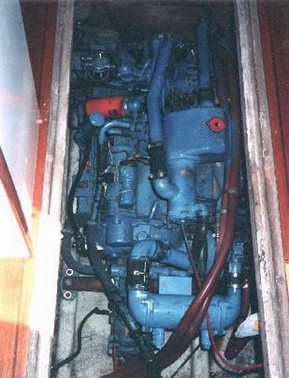 When we bought her |
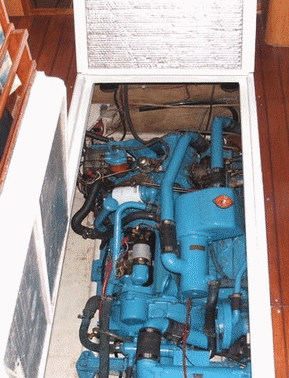 15 yrs later, still spotless |
||
| How about the engine cover/companionway steps
on this sailboat (below, right). After you
manage to get it off, you then have to clamber
over it to check the oil. Do you think the
oil gets checked before every start-up ? My experience as a marine surveyor has shown that the harder it is to get into the engine compartment the lower the level of maintenance. Need proof ? Check out any Carver Riviera 28. or the express cruiser below left. If you really want to maintain your boat you need to make it easier to get into the basement or buy one that is built that way. Didn't anybody complain to the builders when they bought these boats ? |
|||
 |
 |
||
| Bill's Job #2 Now that you've made the engine compartment easy to enter comes the clean up. The thought of crawling around on hands and knees in a caustic soup of oil and various other unknown toxic chemicals in the bilge does not promote a well maintained engine. If the bilge is filthy, do you really believe the impeller, coolant or gear reduction fluid has been changed in the last ten years. |
|||
| How can people ask top dollar for their boat
when the see-thru bowl on the fuel filter isn't see-thru anymore ? Clean and freshly painted engines and engine
compartments are the foundation on which
all other maintenance is built. The photo at right is the freshly cleaned,
painted and re-organized engine room of our
latest acquisition, a 1981 40' Dave Martin
custom design. It has taken a year to get
it looking like this (after I hinged the
hatches). I moved a/c pumps, potable water
pumps, bilge pumps, strainers, batteries and re-routed many hoses and conductors
to give me unfettered access to the
engine
and all systems. If you have really sharp eyes you will see bits of paper towel taped to the generator. I have a tiny coolant leak that showed up after I cleaned and painted the bilge white. The paper towel will be left there for a few days to ensure I have stopped the leak. In a filthy compartment the leak would have gone un-noticed. |
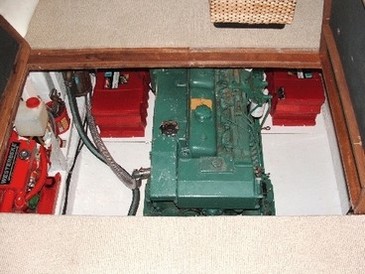 Our newest aquisition - 1st job, hinges on the hatches |
||
| Now For The Fun Stuff I know its taken a while for me to get here but once you can easily enter your spanking clean engine compartment you can address all the things that previous owners did not. Sure every winter they had the local mechanic change the oil, oil filters, fuel filters and flush the engine with anti-freeze (hopefully) but from what I have seen, that's about it for most boats. What follows is all about the stuff that is often ignored, sometimes for years. |
|||
| Gear Reduction Fluid (transmission fluid). it's unlikely that the fluid in your gear reduction unit has ever been changed, how old is your boat ? Do you know how much a gear reduction unit costs ? Do you want to spend July on the hard waiting for it to be fixed ? This fluid, just like your engine oil takes tremendous abuse through heat and the accumulation of metal particles not to mention a small amount of condensation. It will live a lot longer if you change the fluid, now. |
 Gear reduction fluid - Just like checking your oil |
||
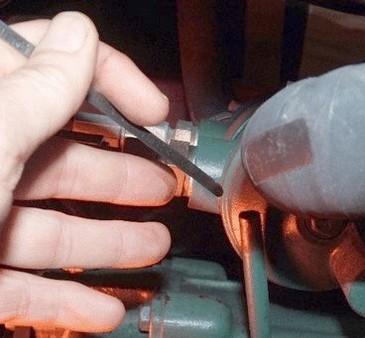
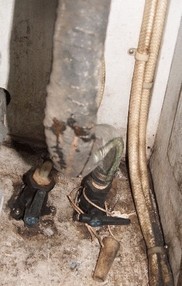
| Raw Water Pumps Too often on surveys I see the screws on impeller pump covers with the original, unmarked paint. This is clear evidence of neglect. Nothing will stop your engine faster than a failed impeller and within a couple of minutes do thousands of dollars damage to your engine. You know this will happen in July. |
|||
| The Neoprene vanes of the impeller are constantly
bent over within the pump housing and the
stress eventually causes them to crack, once
cracked they can disintegrate in a heartbeat.
Your engine will rapidly overheat and eventually
your over temperature alarm will go off.
By the time the alarm goes off (if you have
one) you can bet your pump is damaged ($500.00) and
if you have not blown your engine at the very least you have taken years off its life. The very nature of this issue virtually guarantees the failure will occur at start-up when the impeller is dry, engine overheats and seizes within minutes of leaving the dock (in a
crowded fairway).There are a couple of ways to deal with this. The first is easy ....... pop out the impeller and take a look, if the vanes lack flexibility or show hairline fractures, change it ! What the heck, you don't know how old it is, change it even if it looks good. I have seen the bond between the brass bushing and the neoprene fail with age even though the vanes looked good. |
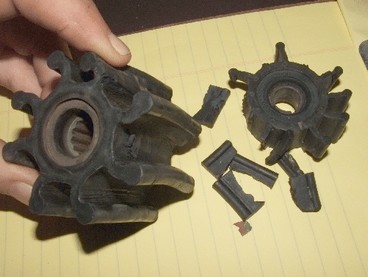 The impeller on the right had been left in the pump over a couple of winter layups and resulted in a $6000.00 rebuild of a 50hp sailboat engine. The impeller on the left is ready to fail at any minute |
||
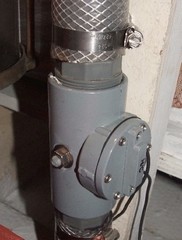
| The second is almost as easy and will be the best $80.00
you'll ever spend on your boat. Its called
a "raw water flow detector" and
gets installed between your sea strainer
and your raw water pump. It has a simple
gate inside that opens with the flow of water
and closes when the flow stops, thereby setting
off an alarm instantly. It takes several minutes for an overheat alarm to sound off and when it does its often too late and many boats don't have overheat alarms to begin with. Check theese out at https://www.aqualarm.net PS. they are even cheaper on amazon.com |
 |
||
| Gauges Why on earth would a builder install an engine without oil or temperature guages as many sailboat builders do ? Some don't even have idiot lights. Why on earth do people buy new boats like this ? Until consumers start bitching about this nothing will change. Its not that expensive for a competent do-it-yourselfer to install gauges but don't put them in the footwell of a sailboat. They're not much good if you can't see them from the wheel. You know why they are called idiot lights don't you. |
Coolant If you have generator or an engine with a heat exchanger for a closed cooling system when did you last check it or actually change the coolant ? Several times this year I have seen heat exchangers with no coolant and a few times seen coolant that was so old it had turned to jelly, no wonder it was overheating . I have also surveyed three boats this year with oil in the coolant .......not good. Coolant should be part of your routine pre-start check list. Just like oil and gear reduction fluid it picks up a lot of crap over the years and loses its corrosion inhibiting properties over time. Change it ! |
||
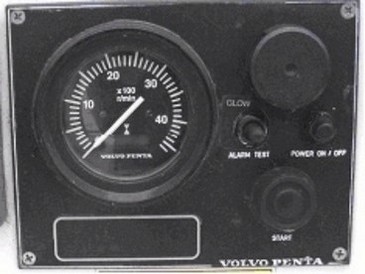 unacceptable engine panel |
 dry heat exchanger |
||
| Throughulls and Seacocks This cheap plastic throughull is seriously UV degraded and can be scraped off with a finger nail. It is very brittle and right at the waterline. The first bit of floating debris it encounters is going to peel it right off. All at or below the waterline throughulls should be bronze. The caulking patched around this piece of plastic junk (factory original) proves it is already failing. Invest some money in real throughulls and seacocks. Remember they are nothing more than holes in your boat. Also beware of brass seacocks in European built boats and parts of questionable metalurgy from China. |
 |
||
| Yes, I said brass. Please do yourself a favour
and read these two articles from an
English
surveyor about the now very common
brass
throughulls and seacocks being used
on mostly
European boats. Paul Stevens article #1 .... Paul Stevens article #2 I once surveyed a sailboat for a fella who had owned it for 30 years. When I told him all his seacocks (gatevalves) were seized he responded " What's a seacock" . Take this tip seriously. Exercise your seacocks. Once a week , open and close your cocks a couple of times or eventually they will seize. if they are seized now, dismantle and lubricate them. If you have gate valves (garden taps) instead of proper seacocks, get rid of them. You have no way of knowing if these are closed or open. |
 The lever on this ball valve has rusted away. You think it still works ? |
||
| Hoses When I survey a boat, one of the things I do is squeeze the hoses. The galley sink drain hose ( below the waterline ) in the photo at right was so rotten when squeezed that water started to weep right through it and the already present cracks opened up to the point that you can see the fabric under the rubber outer layer. Notice that I promptly closed the seacock as this boat was going to the bottom in short order. Check all your hoses. I'm constantly amazed at the number of boats infected with an odour of waste. I could not stand that smell on my boat and if I could, my wife sure wouldn't put up with it. More often than not the odour comes from the hoses themselves and not from a leaking tank or fitting . First get some antiseptic hand wash ready then rub your hand on the hose ...... take a whiff. Time for new hose ?. Sanitary hose does not last for ever and the good stuff is expensive but worth it. Squeeze all your hoses ! |
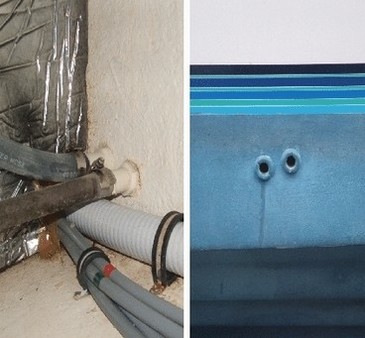 This shows two cheap plastic throughulls just below the waterline with no seacocks fitted. Yes. they built it that way ! |
||
|
Far right - On many boats such as the
one
in the photo at right, these hoses
are virtually
inaccessible. This one could only been
seen
through a 10" deck plate. I didn't
have
to rub this one to tell it was rotten
as
when I squeezed it my thumb went right
through
it . That black sludge you see under
the
hoses was 1/8" of gasoline and
oil sitting
on top of the fuel tank. To replace
this
hose is about $80.00 for the hose and
about
$400.00 for the labour . Service people
love
those boat builders . Near right - this hose from the galley sink started leaking when I squeezed it. And by the way .......... Check all your hoses. |
 |
 |
|
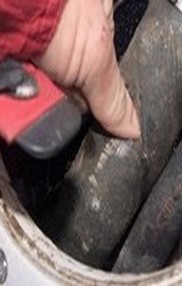
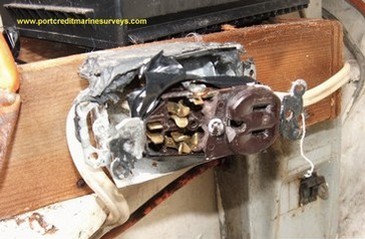
| AC Electrical Far right - I wiggled this plug to see it it was tight.it went off like a bomb in my hand. Near right - any signs or arcing whatsoever and the cord should be replaced. Many people never disconnect both ends of their shore power cords and some idiots even pull the plug from their boats and leave a live cord lying on the dock. At least a couple of times a season, pull the plugs and look at the contacts. If you see discolouration, loose prongs, corrosion on the contacts or black on the yellow plastic .... get new stuff. This is one you don't want to delay. |
 |
||
| Boats vibrate and electrical contacts can
come loose. an annual tightening is warranted.
Repairing a melted outlet with electrical
tape is not acceptable. For some simple tests to confirm the integrity of your shorepower system take a look at Marine Survey 101 |
 |
||
| DC Electrical The picture at right is worth a thousand words. C'mon, clean it up before you hurt someone. |
 |
||
| Sailboat Rigging Many store their boats on the hard over winter with masts stepped. I would suggest to those people that they go aboard in February with the wind howling at 40knots. After they witness the ear splitting groaning and screeching of the hull as it twists and ratchets they will give serious consideration to dropping the stick next winter. Leaving the stick up for years at a time is not helpful from a maintenance standpoint as it's tough to spot stuff like the unsecured forestay at right. More info.... Navtecs guide to Rigging Inspection or The USCG recommended Rigging Survey. or Lewmar's very good winch service manual. |
 forestay clevis pin with about about 1/8" to go before the rig is lost I spotted this with binoculars while surveying a boat that was about to be launched. |
||
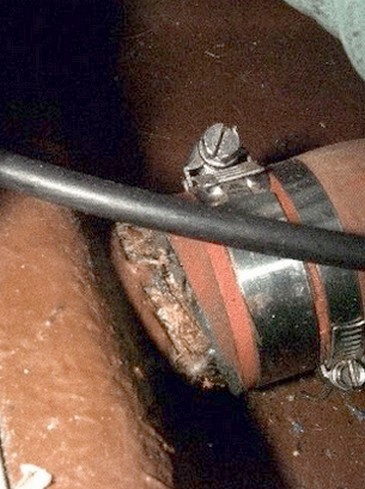
| Stuffing Boxes Etc. At 2000RPM with a 2:1 gear reduction your shaft turns 60,000 per hour. and you run your boat for 100hours/year, Thats 6,000,000 cyclic vibrations and abrasions on your stuffing box, stern tube and cutless bearing. When was the last time you checked this stuff ? Look just aft of the stuffing box hose in the photo at right and you will see the FRP stern tube starting to delaminate. This is likely due to few million misaligned shaft revolutions. When this breaks only a 5hp 1 1/2" emergency bilge pump is going to keep this boat afloat. Do you have one ? I often see unreinforced hose and plastic instead of bronze stuffing boxes. Get a bronze box and use only wire reinforced hose. Underway your stuffing box should drip about 3-4 drops per minute with the shaft engaged, at rest there should be no drops at all. Changing the stuffing can be done in water but for first timers do it on the hard. In salt water those 3-4 drops will be sprayed all over the compartment and will cause a lot of corrosion. We cut the bottom off a plastic juice jug, slit it lengthwise and slip it over the box. This traps the flying drips and lets them fall into the bilge where they belong.  |
 |
||